¶ Overview
The "search" portion of this service is really just SearX.
![]()
SearX is an open source project that is a "meta" search engine. Search engines come in two flavors:
- Search Engine - crawls the web and stores its' own index of all websites and pages. This does all of the work of finding every website, and storing all of the data about all found websites. Examples: Google, Bing, DuckDuckGo, etc.
- Meta Search Engine - lightweight tool that connects to several search engines to aggregate results for a user.
SearX is a meta search engine. It connects to search engines anonymously to get search results. It is very fast, and uses very little in terms of resources (e.g. CPU, RAM, and Disk).
More Information: https://en.wikipedia.org/wiki/Searx
¶ Requirements
There are no published requirements but from here and our own testing, this can run fine on a low-powered Raspberry Pi with 512mb of RAM.
¶ Web Server and Reverse Proxy
You will need to install a web server that supports doing a "reverse proxy". That is where instead of the web server serving pages, it re-hosts content from a "web server" that is running locally, on another port (e.g. 8080, 9000, etc). For example:
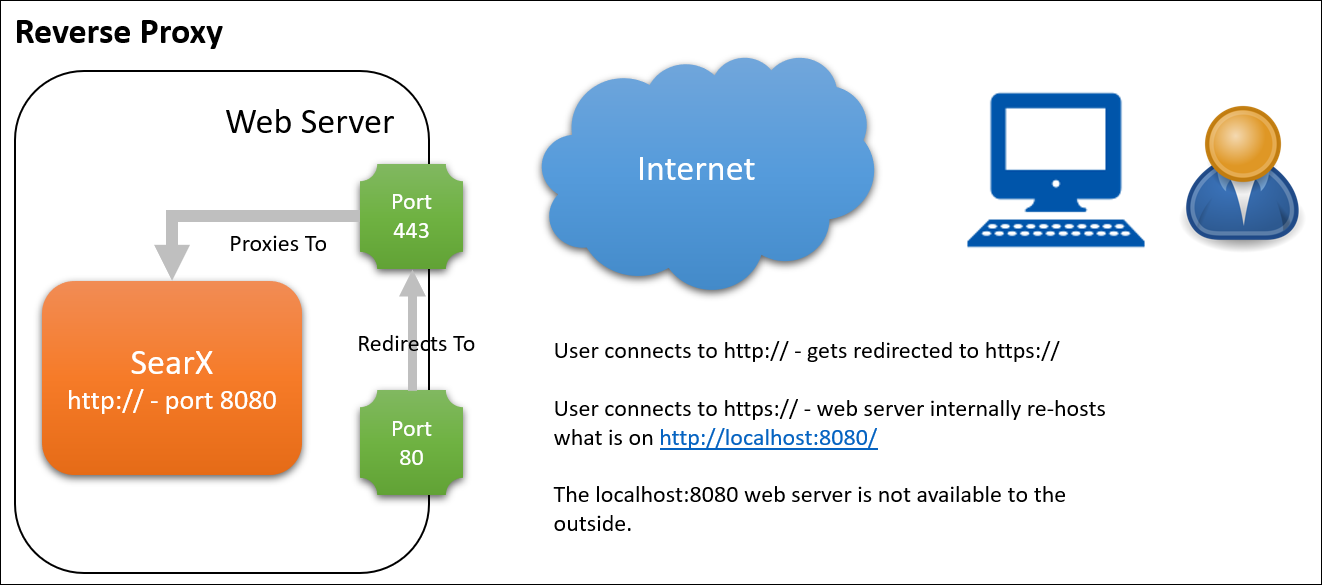
¶ Why Reverse Proxy?
If this application is capable of hosting a web server, why not just expose that web server directly to the internet?
The short answer is: security. These mini web servers that are used in a lot of these technologies, only know how to do the basic things. They know how to serve-up web pages or REST API's.
Instead, if you re-host that inner content via a purpose-built web server like Nginx or Apache, then you can take advantage or all of the tools and techniques that have already been time-tested.
¶ Packages
Before you kick off the installation steps, install pre-requisites. This installation will use Nginx as the web server. Modify as you see fit if you want to use a different web server:
sudo apt install nginx certbot python3-certbot-nginx git python3 python3-pip python3-venv uwsgi uwsgi-plugin-python -y
This will install Nginx, certbot - the facility used to get and renew SSL certificates from Let's Encrypt, and the git command line, which we'll need to pull down the source code. Python3 and the "pip" installer are needed for the SearX installer too.
¶ Installation
This installation will assume an Ubuntu server installation. You can work from these:
I will re-summarize the instructions here, and will change just a couple of things like the working directory, and to have everything be accessible to the www-data user and group.
¶ Step 1: Make a Directory
Even though this "website" won't be directly hosted from the typical /var/www/html folder that Nginx and Apache uses, I like to put the files there so that they are easy, obvious, and intuitive to find.
sudo mkdir /var/www/search.fipstorage.com
Where the search.fipstorage.com is the name of the website that you are hosting. It doesn't need to be named this, but that does help make it more obvious to future sysadmins.
Also, correct the file ownership so that www-data owns these files, as opposed to root:
chown -R www-data:www-data /var/www/search.fipstorage.
¶ Step 2: Copy (git clone) Files
Now we need to get the files from Github. Let's put them right into this new folder:
sudo git clone https://github.com/searx/searx /var/www/search.fipstorage.com
then switch into that directory:
cd /var/www/search.fipstorage.com
¶ Please Note:
From this point on, we will split between regular Linux installations and an installation on a Raspberry Pi. On a Pi, the
uswgifunctionality is not implemented. So, we get this working in a different way. So below, choose your path...
¶ Step 3: Install SearX
From the root of that application directory, run:
sudo -H ./utils/searx.sh install all
This installs the main search engine itself. It will give you lots of progress updates, and keep prompting for you to press Enter. Just press Enter and continue.
¶ Step 4: Install Filtron (proxy)
From the root of that application directory, run:
sudo -H ./utils/filtron.sh install all
This installs the feature that lets you see the search results, proxied through this web server - as opposed to directly from your browser.
¶ Step 5: Install Morty
From the root of that application directory, run:
sudo -H ./utils/morty.sh install all
This installs the feature that lets you browser websites via this search engine, as opposed to directly from your browser.
¶ Step 3: Install SearX
Instead of using the ./utils/searx.sh install all command, we need to do those steps separately, since the uswgi functionality does not work correctly on Raspberry Pi. You can follow the step-by-step instructions, from here.
¶ Create a searx user
Run:
sudo -H useradd --shell /bin/bash --system \
    --home-dir "/usr/local/searx" \
    --comment 'Privacy-respecting metasearch engine' searx

sudo -H mkdir "/usr/local/searx"
sudo -H chown -R "searx:searx" "/usr/local/searx"
¶ Install searx and Dependencies via the searx account
¶ Tip:
Periodically, you'll need to impersonate the
searxuser with a command like:sudo -H -u searx -iWhen you are done with what you need to do as that impersonated account, type
exitand Enter to exit out of that user context and back to the user context you came from.
Run:
# Run as searx:
sudo -H -u searx -i

# Now clone the repository:
git clone "https://github.com/searx/searx.git" "/usr/local/searx/searx-src"
¶ Install Python dependencies
The official instructions talk about setting up a virtual environment (aka venv), but since this will be the only thing this server does, we can just install the necessary packages at a machine-level. Run (still as the searx user):
pip install -U pip
pip install -U setuptools
pip install -U wheel
pip install -U pyyaml

# jump to searx's working tree and install searx into virtualenv
cd "/usr/local/searx/searx-src"
pip install -e .

# Exit from this searx user
exit
¶ Set up configuration
Run:
sudo -H mkdir -p "/etc/searx"
sudo -H cp "/usr/local/searx/searx-src/utils/templates/etc/searx/use_default_settings.yml" \
             "/etc/searx/settings.yml"
then run the following to fill in a key values in the config file:
# Inject a random key to anonymize this instance while connecting to other search engines.
sudo -H sed -i -e "s/ultrasecretkey/$(openssl rand -hex 16)/g" "/etc/searx/settings.yml"

# Inject the hostname.
sudo -H sed -i -e "s/{instance_name}/searx@$(uname -n)/g" "/etc/searx/settings.yml"
¶ Bring up searx manually
See if we can start the mini-web server by hand. Run:
# (Optional) Enable debug ..
# sudo -H sed -i -e "s/debug : False/debug : True/g" "/etc/searx/settings.yml"

# Run as the searx user:
sudo -H -u searx -i

# Start the web server:
cd /usr/local/searx/searx-src
export SEARX_SETTINGS_PATH="/etc/searx/settings.yml"
python searx/webapp.py

# (Optional) Disable debug
# sudo -H sed -i -e "s/debug : True/debug : False/g" "/etc/searx/settings.yml"
You should see an output like this, which means the server is working:

¶ Run as a Service
On the Raspberry Pi,
¶ Step 4: Install Filtron (proxy)
From the root of that application directory, run:
sudo -H ./utils/filtron.sh install all
This installs the feature that lets you see the search results, proxied through this web server - as opposed to directly from your browser.
¶ Step 5: Install Morty
From the root of that application directory, run:
sudo -H ./utils/morty.sh install all
This installs the feature that lets you browser websites via this search engine, as opposed to directly from your browser.